We had another wonderful week learning about what happened to Noah and his family after the Flood, and about Mesopotamia and the Fertile Crescent.

On Monday we learned how to make a quick sketch of the Bible Lands using the silly sentence, "E.T. purrs in the red nile med." The kids thought this was hilarious and really enjoyed their newfound map drawing abilities. I even found tiny Bible Lands drawn on some math pages this week.

We worked together to craft a summary of Noah for their notebooks. I wrote it for Mister E's and Miss M typed hers on the computer, printed it out, and pasted it on. I think I own every reproducible Bible times coloring book out there. The kids love picking out a picture to color while I read to them.

Mister E said Noah got really dirty while building the ark, that's why he colored so much dirt on him. And his skin was brown because he worked outside in the sun so much that he got "toasted.


We added another Greek root word to our line: "photos" which means "light." We had lots of fun talking about derivative words and making up a few of our own! We are all having so much fun with this! Even Mister E who is not officially joining us for the roots is having fun remembering what they all mean.

My Father's World typically starts out the school year with a handwriting review of a couple letters per day for the first couple weeks. We got a late start because the book I ordered from Rainbow Resource didn't get shipped out till the day we started. (They were doing warehouse inventory and I missed the ordering deadline by mere hours!) Instead of doing a couple letters a day, she's been doing just one letter, lowercase and capital, per day, so it is going to take her longer than prescribed for her to complete the review. Oh, and in case you're wondering, the book is Cursive Connections. I love that they give you permission to make photocopies for use within your own family or classroom!


Although we are using Singapore Math, I exchanged a series of emails with Maria Miller of Math Mammoth this week in the course of which she shared with me an amazing resource! The Game That Is Worth 1,000 Worksheets is aptly titled and very simple to implement. It seems it would work *best* if you have kids who can play amongst themselves, but can also be done with one parent and one student. I think I will pick up a couple extra decks of playing cards the next time I'm at the dollar store and make up a set of "math cards."

I can't remember how it happened, but somehow we didn't get in one of our art lessons this week, so we'll have to play catch-up next week. We did, however, draw "An Independent Study of Ellipses" by going around the house and sketching anything we could find that was comprised of ellipses. It was fun, and I was seriously impressed with Miss M's work! I have never seen her draw like that before!

Mister E is still somewhat resistant to drawing, so he didn't join in the ellipse activity, but he did the next lesson with us which was copying various images. He did very well!
I have never in my life bought refrigerated sugar cookie dough. I have a tried and true recipe that I have used for years, since long before I ever got married or had kids. But...in the midst of homeschooling, mixing up a batch of sugar cookie dough just seemed like a pain, so I opted for convenience and bought a tube of Pillsbury which was the only brand that didn't say "processed in a facility that also processes peanuts and other tree nuts." I'm telling you, that simple choice made this project so fun and painless!

After learning about cuneiform writing, the ancient script of the Sumerians (though not the oldest writing system as they once thought -- something I learned this week!), we all headed upstairs to inscribe some "clay tablets" with important messages. Using sugar cookie dough and the tips of spoons, the kids wrote their initials. I made sure to take pictures before they went into the oven, because by the time they came out, the markings were much too faint to read any longer. This was a fun and tasty exercise and one that the kids will remember for a long time!

In science we continued learning about light. We learned more about how light is reflected, about why we can see ourselves when we look into a mirror (and not at a white piece of paper). We even pulled out the microscope quickly to take a closer look at a piece of paper. But our favorite activity of the week was making a CFL lightbulb glow (in a dark room) just by waving a balloon over the top of it. Really, if you are ever bored, you've got to give it a try! It was a demonstration of the Law of Energy Conservation: Energy cannot be created or destroyed. It can only be converted from one form to another.

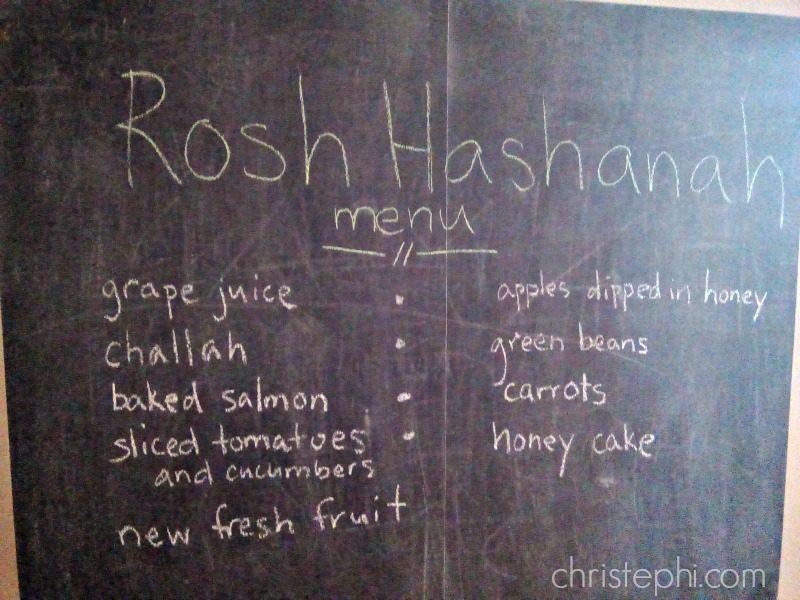
We ended our week with an out-of-season celebration of Rosh Hashanah. I followed the menu and recipes from the curriculum pretty much exactly. (I did use raw carrot sticks instead of the honey glazed carrots because I personally cannot stand cooked carrots, but I love raw ones).
Miss M found some Rosh Hashanah crafts in a book from the library, so she set herself the task of making some decorations for our table -- a paper plate "apple" and a plastic cup "flower" complete with pipe cleaner bumblebee!

She worked together with her brother to create a crown for our globe to remind us on this special day that God is the King of the Universe.

The honey cake turned out wonderfully! I used the second one as Hubby's birthday cake. Happy 40th birthday, dear! I'm also pretty sure everyone ate cake for breakfast on Sunday morning. Shhh, don't tell! Leftovers are being stored in a large cookie tin. I just love the old-fashionedness of storing baked goods in tins!

You can't properly celebrate Rosh Hashanah without a gorgeous loaf of challah! Miss M did a wonderful job braiding hers herself, didn't she?

I used my bread machine to mix the dough, as usual. And the recipe in the book is so similar to my Country Buttermilk Bread recipe, that this time I just used it , subbing plain water for the buttermilk. I only made the switch because I know my recipe fits my machine -- the other recipe was a wee bit too large. We sprinkled both loaves with sesame and poppy seeds. Delicious!
This week we will continue blowing the shofar at the start of each day. Our celebration of Yom Kippur is going to arrive a little early though -- just one week later instead of 10 days. I guess that's what happens when you're just learning and celebrating out of season, right?
We are looking forward to Week 4 where the kids will be introduced to the Ancient Egyptians for the first time. I sure hope they like it, because we are going to be camped out in Ancient Egypt for quite a few weeks!
How did it turn out with water instead of your normal buttermilk? We have a life-threatening dairy allergy over here so we'd have to do it with water anyhow.
ReplyDeleteIt turned out just fine using water (and is more authentic that way too). :-)
Delete